If you have purchased a 7 and 8 course lute plan from me, then this page provides information and backup for that plan. I taught adult education in Bristol, Bath and Swindon from 1978 to 2000 and this plan evolved during those classes. There were many revisions, the latest being the inclusion of dimensions for both 7 and 8 course lutes.
You will be directed towards making a lute based on the old lutes but which will be acceptable to modern players of historical lutes. Many organisations are mentioned here. If they have a website or email address, that will be on my links page.
There are many good books on guitar making which will provide much of the information needed - planing, thicknessing, wood bending, joining the soundboard, glues, seasoning timber, etc. Check your local library - books can often be reserved on the internet.
Robert Lundberg's excellent articles from the magazine of the Guild of American Luthier's American Lutherie are now available in book form. It is a wonderful book and the photographs of old lutes are exceptional. It costs $75. Have a look at the GAL website for further information.
The next necessity is a plan. Museum plans are very valuable - they show so much detail about how lutes were made. Do not be tempted to buy a plan from a museum and make an instrument from that plan. The plans show the instrument as it exists today; often too large or small for today's players, damaged, modified or repaired. It is rare (but not unknown) to see an modern lute that is a copy of a museum lute.
Besides my own 7/8 course lute plan, there are several sources of plans for making modern recreations of the lute.
The Lute Society (the UK one) sells four plans. The six course and chitarrone are especially good, while the 7 and 10/11 course plans are a little out of date.
The shape of the bodies of old lutes is quite complex. For one thing, the cross section of the lute body was rarely a semi-circle. For another, the first and last ribs are larger than the rest. The 7 and 10/11 course plans ignore this, but they are meant to be used in conjunction with the Lute Society Booklet No. 4, Lute Construction.
Guild of American Lutherie sells plans for many types of lute, but cautions that they are meant to be used in conjuntion with the Robert Lundberg articles. From what I have seen of these plans, they give a lot of information.
Choosing materials and the design of a lute can be daunting. Fortunately, quite a few lute makers now have catalogues on the internet and it is possible to read descriptions and see pictures of their lutes. You will get some very good ideas from these pages. If they make a particular type of lute, then you probably can make one of that type too. If the established makers don't make what you want to make, find out why they don't.
If you want to know what woods I use and what styles of lutes I make, look at my own price list. There are more European lute makers to investigate on my links page and a more comprehensive list of makers can be found on any of the Lute Societies pages.
The wood from the soundboard should always be Swiss pine (picea Abies) (at least that's my opinion!) obtainable from musical instrument manufacturers suppliers. These are often listed in the back of woodworking magazines.
Be certain to use old fashioned hide glue - the stuff that smells and needs a double boiler. Actually, if you get the glue from violin maker's suppliers, it will be surprisingly pure and non-smelly. The unique advantage of this glue is that it comes apart with heat and moisture, making all sorts of repairs possible.
A great deal of research has been published in the Lute Societies Newsletters, the magazine Early Music, the Galpin Society Journal and the FoMRHMI quarterly. Many of these publications now have an index on the internet.
Beware of books and plans which allow a lute to have metal frets, use guitar strings, use violin pegs or tuning machines, use different wood for the soundboard, or make very heavy lutes after Hermann Hauser. Most lute players prefer historical instruments - this is what gives the lute as a woodwork project an extra dimension. The lute is a tool for musicians.
First Projects
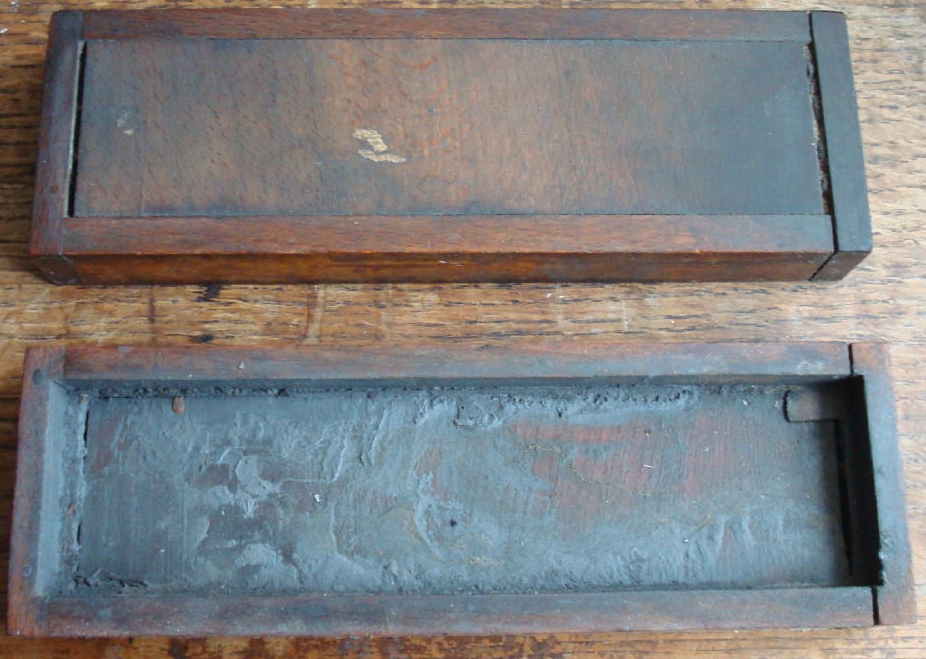
In the days when woodworkers took apprentices, a wooden box for a sharpening stone was often the first project. It is still a useful first project and I use mine every day. It means the sharpening stone has to be obtained first and the box made the correct size to contain it. Make the box of hardwood, beech is a good choice. The stone could be an 8 inch India combination stone, fine one one side and medium on the other.
As you can see, in 1973, I made my box too small and had to chisel out the ends to fit the stone in! Try to avoid this, but see note 6 below!
I also chose the grain for the lid incorrectly. Had the grain run the length of the box there would have been less shrinkage. For sharpening, I tend use white spirit instead of oil on the stone. Oil makes the woodwork the hands very dirty and this is transferred to the work. Musical instruments spend a lot of time in the maker's hands! Take care as white spirit is rather flammable.
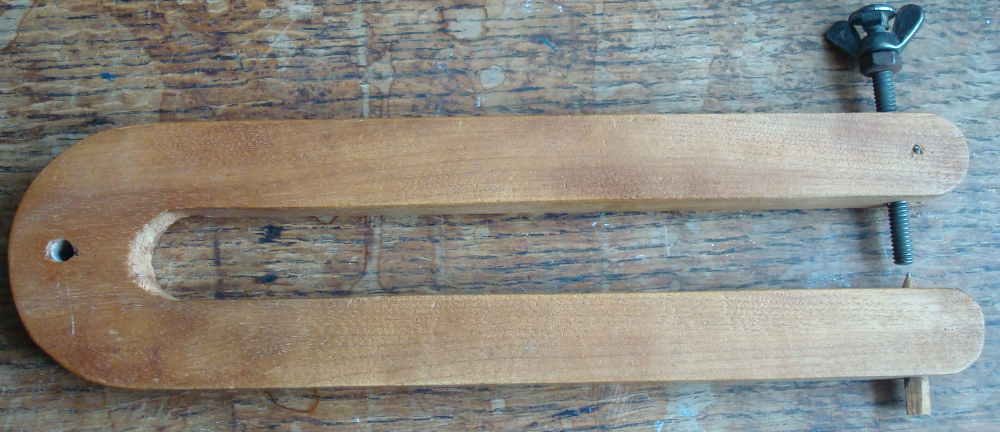
A second useful project is a thicknes gauge. It is made of a u-shaped piece of hardwood and the ends of the arms are pierced with 7mm holes. In one hole is a coach bolt, if the bolt and hole are just the correct sizes, the coach bolt will make it's own thread in the hole. A small screw near to and at right angles to the bolt will fix it tight when necessary.
In the other arm a small piece of softwood is jammed into the hole. The softwood is first has a small nail epoxied into it's centre, then is whittled so the nail head is opposite the bolt. Click on the picture.
In use the distance between the sharpened nail and the tip of the bolt is adjusted with a feeler gauge and the wood to be thicknessed is passed between the two points and in marked where it is too thick. It's easier to make small scratches and remember to only scratch the inside surface of the work.
Increase Your Skills
The woodworking in musical instrument making is demanding andneeds to be precise and careful. The following practices will immediately raise the standard of woodwork
- Make all important measurements twice, and ensure both readings are the same.
- Use a sharp 2b pencil to mark out shapes, and when cutting, always leave the pencil line on the work.
- Use planes and chisels very sharp.
- Do not throw away any offcuts. Beside being useful as repair stock, offcuts can be used to make temporary tools and to test finishes. Soundboard offcuts are used as bars.
- Avoid planing the wood too thin. There is a marked tendency towards lots of expensive shavings.
- Avoid making pieces too small. Every first instrument is smaller than the plan.
- Learn to sharpen and use a cabinet scraper.
- Learn to mix, cook and use the old fashioned hide glue.
- Fit and test all joints dry before applying glue. Use pads to protect the wood from pressure marks from metal clamps. Prevent the pads from being glued to the work by separating the work and the pads with paper.
- Dents in unfinished the wood can sometimes be steamed out with a hot clothes iron and a damp cloth.
- Avoid sandpaper, power sanders and files as tools for making joints or flat surfaces.
Order of Construction of a Lute
- Decide which type of lute is required.
- Obtain - buy or draw - a plan.
- Purchase materials.
- Make the mold.
- Make inner end clasp and front block, attach to the to mold.
- Thickness and bend the ribs.
- Starting with the centre rib, make the lute body.
- Add paper reinforcement tapes and makers label.
- Turn, or buy, the pegs.
- Make the pegbox and blank for neck.
- Cut neck to body joint, extend new centreline down neck.
- Cut neck to pegbox joint.
- Shape the neck.
- Glue pegbox to neck and neck to pegbox.
- Attach fingerboard to top of neck.
- Have a months holiday.
- Join the two halves of the soundboard.
- Cut out lute shape, save off cuts.
- Plane soundboard to thickness.
- Cut rose.
- Make the bridge.
- Place soundboard on lute and mark position of bridge.
- Draw outline of lute on soundboard and mark positions of bars.
- Glue on bridge.
- Glue on oversize bars and trim to height and length.
- Test for fit, then glue on soundboard.
- Trim soundboard.
- Sand instrument clean.
- Damp lute to raise grain.
- Sand again - lute is 'finished in the white'.
- Apply finishes.
- Fit pegs.
- Make nut.
- Fit strings and gut frets.
Questions and answers about making lutes
from the plans by Art Robb
All from emails sent by people working from the lute plan
Ky from New Zealand asks:
Firstly, must Swiss pine be used for the soundboard (of the lute), or can one also use Cedar or Redwood as used on acoustic guitars, secondly, do ribs get thicker as the number of strings increases, and thirdly, must quarter sawn timber be used for the ribs?
Art's reply:
My thinking on lute soundboards is to only use Swiss pine, picea Abies. It works far better than WRC and the cost of a good soundboard seems to disappear during the time it takes to make a lute. To my knowledge, ribs do not get thicker as the number of strings increases but I am no expert on old Baroque lutes (where most of the extra strings are found!) so I don't know what happens there. Perhaps nothing as the old early Rennaissance lutes were prized as bodies for re-necking and Baroquing.
Quartersawn ribs are stronger - I assume you are after the slab cut apearance. Take a piece down to 1.5mm or so and see if it still has strength and integrity. There are no real rules for ribs - there has always been a huge variety. But they are all very thin.
Ky again:
I am going to take your advice and use swiss pine. I have however just this morning found that there is nowhere in New Zealand that I can get reasonable cuts of this wood, so I am once again troubling you for a suggestion as to where I may get some airmailed from, be it England, Europe or America.
Art's reply:
The folks I deal with in England are Touchstone Tonewoods, 44 Albert Road North, Reigate, Surrey, RH2 9EZ, England
Tel 0044-(0)1737-221064 Fax 0044-(0)1737-242748
They have Swiss pine and will send a catalogue if asked.
and Ky again:
...but what I would like to ask you, is it safe for me to assume that the construction (of a baroque lute) as such is going to be similar to that of the 7-course lute as in the plans I purchased from you? Other than that, the only problem I have as yet not solved is how to best attach the rider to the peg-box. Lastly, actually regarding the plans I got from you, I would just like to clarify a point regarding the pegs themselves. Am I correct in assuming that the pegs are all made to the specification outlined, and then cut the required length?
Art's reply:
There are a lot of differences between a baroque and Renaissance lutes - especially noticeable will be body shapes, barring, strings and string lengths. The lute societies sell good baroque lute plans. I have attached the treble rider to the peg box on my baroque lutes with a tenon that fits into the peg box inside, thus not noticeable from the outside.
Certainly lute pegs are made in bulk and fitted to the lute later. You can make a few shorties if wood is precious. **********************************************************
From Tom in the USA:
I recently received your seven course lute plan. The plans are very clear; however, I do have one question. On the plan there is a dashed circle located under the bridge. Is the circle a reinforcement to be glued to the underside of the soundboard?
Art's reply:
The old lutes of this period had the bars placed on the soundboard in very careful pattern. There were several variations of the pattern and my plan uses the following:
The overall length of the body is divided into nine parts, with bars glued onto divisions 3, 4, 5, 6 and 7. The rose is at division 4.
The old lute makers used dividers to mark these positions and old soundboards exist with the division marks scribed on the back of the soundboard. My plan shows these marks as small arcs.
In the area of the bridge two divisions are divided into three parts and the scribed circle you mention is drawn with a radius of '1/3 of two divisions' and placed with its center of the '1/3 of two divisions points'.
The bridge lies across the centre of the circle and any small bars are often tangent to (approximately) the circle.
All this is described in the article "On the Construction of the Lute Belly" by Friedman Hellwig in the Galpin Society Journal, 1968.
**********************************************************
Hello Art!
Well, I finally got started on my lute!
Man, how I hated to see all the waste on the rib material. I had someone cut it up for me on a table saw and I think there was more waste because of the 1/8" per saw cut than there was finished material. He said his band saw wasn't good enough for cutting the ribs - even with a fence, the blade would wander and give a squiggly cut which would be a real pain to try to smooth out.
I have a question about the front and rear blocks - I think they're supposed to be a hard European Pine - what would be a good substitute? I think the guy at the wood shop said I could use willow, and for some reason I thought I had some of that but it turned out to be yellow birch (hard birch). I don't want to have to buy a half a tree for a couple of small blocks.
Alan
Art's reply:
I use a bandsaw every time and still hate to see the waste!
The front block needs to be light and strong. I suggest you compare densities with your birch. The front block can damp the sound if too heavy. As for the inner end clasp, that could be made from excess soundboard material.
*******************************************************
Art--
I found your web page, and would like to pose a question. On the harpsichord mailing list a recent thread has returned once again to the question whether equal temperament had a place in the 16th and 17th centuries. One posting asserted that 16th-C luthiers used a simple geometric construction to lay out a set of equal-tempered frets: Erect a perpendicular to line AB at A, pick any point C on the perpendicular, divide AC into 12 equal parts, connect each point to B. Bisect BC at E. Intersections of AE with the other lines define the fret locations for a string of length 2*AE. I have done the math and found that the assertion is dead wrong (the construction in fact divides the octave into twelve intervals with equal *differences* in frequencies (not equal ratios). But I wondered whether this construction has any role that you, might be aware of.
--Don
Art's reply:
There is a geometrical solution to equal temperament but I don't think you have it exactly right. It also is not very accurate. I think the correct method almost works! The method is:
Divide the string length by 17.817. The result is the distance from the nut to the first fret.
Subtract the first result fom the string length and divide the remainder by 17.817. The result is the distance from the first fret to the second fret.
Subtract the second result from the remaining string length etc.
I suspect the old lute players had great skill in adjusting their movable frets, and had many theories.
If you want to get serious about this, try Mark Lindley's "Lutes, Viols and Temperaments", Cambridge University Press, 1984.
******************************************************
From Henry
BTW: some 30 years ago there was a "private press" book out of Georgia (US), Atlanta or Savannah as I recall, on building a lute. (Has it really been that long ago?) It took some lumps in the review in the Journal of the Galpin Society and if I had a full run I could trace it out.
Art's reply:
I know the book from Savannah - Lute Construction by Robert Cooper. It does not have too much to recommend it. The plan is for a very heavy German 1920's lute and much of the work described is better done in other ways. I suppose the order of construction is OK. I notice it has a history by Suzanne Bloch. I ran across her charming account of rediscovering lutes early in this century on the American Lute Society's website.
From Henry again:
BTW - As "Swiss pine" appears to be the only choice for the sound board, do you know of suppliers? (preferably NA, as here the postage could hurt); or, as I do still have relatives in Switzerland - a shopping visit to wood merchants would be an excuse for a visit...
Don't know American suppliers, but see above for UK source.
******************************************************
From Mehmet:
Thank you sending the plan. I am happy to receive this plan. It may be sufficient for experienced individuals but I do not understand everything. I will ask you following questions if do not mind.
There are circled numbers on the sound board! are they thickness?
Reply: Yes, in millimetres
What is the doted circle under the bridge?
Reply: Answer already above.
There are numbers of the bars like 3.6x7.2 or 3.9x18.9 I could not relate them.
Reply: Width and height in millimeters.
The outer clasp: what is made from?
Reply: Same wood as the ribs. Good question that, I'll add the info on the plan.
The drawing at the bottom: is it half of it?
Reply: No, a side view. The shape is different.
Thickness of the finger board: 1.5mm ?
Reply: No. 2.0mm.
******************************************************
From Paddy, 2009 in the UK:
I have nearly finished my lute - could you advise on finishes - whether it should be sealed and varnished - qualasoled etc - what are the options?
Reply:
For the body, neck and pegbox:
Oil or varnish. Do a test piece first. Even dilute polyurethane will work.
Fingerboard:
Real unboiled linseed oil diluted with 10% real turpentine. Best in the world for all fingerboards, but don't let it puddle.
Soundboard: Nothing or egg white diluted with 75% water. Paint on a couple of coats.
Hope that helps. Send photos when you have finished!
Paddy again:
Really helpful - thanks!
I'll send photos - I'm very slow - but we'll get there....
*****************************************************************
John, 2010:
May I please ask two questions about the mould?
Q1. Your plans show the bulkheads having square edges. Is it best to cut them out that way, and then facet them and put wedges on the facets to conform to the interior shape of the bowl, or is it best to cut them out oversize and then plane/sand angled facets back to conform to the bowl interior?
You can leave them square. They only touch the lute bowl along one edge. You can also make facets, but it's a lot more work.
Q2. Is your plan intended for making the mould in solid mdf, or should the baseboard and bulkheads have interior cut outs (so that they look like the ribs of a whale skeleton)? I guess what I am asking is when gluing the strips round the mould to make the bowl, do you put the interior paper* re-inforcement on at the same time as gluing the strips together, of afterwards once the bowl has come off the mould?
Any interior cut outs are helpful. They lighten the mould and allow access to the interior. The paper reinforcing strips are added after the bowl comes off the mould. Good rag content paper is perfect. Parchment can distort the bowl, in my experience. Personally, I prefer solid moulds, but that is a lot of work!